Below are all instructions for creating your account with the Pak Exchange Network and accepting your first connection request. We have also included the full training document at the bottom of this page if you prefer to download the guide to your local machine.
As always if there are any questions that this guide does not answer we do ask that you open a support ticket through the Customer Success Portal so we can address your questions quickly and efficiently.
If you have questions or concerns regarding this Quick Start Guide or any other provided documentation, please contact the Training Department: training@pakenergy.com.
TABLE OF CONTENTS
- Overview
- Email Invitation Received
- Account Creation
- Password Requirements
- Accepting First Connection Request
Overview
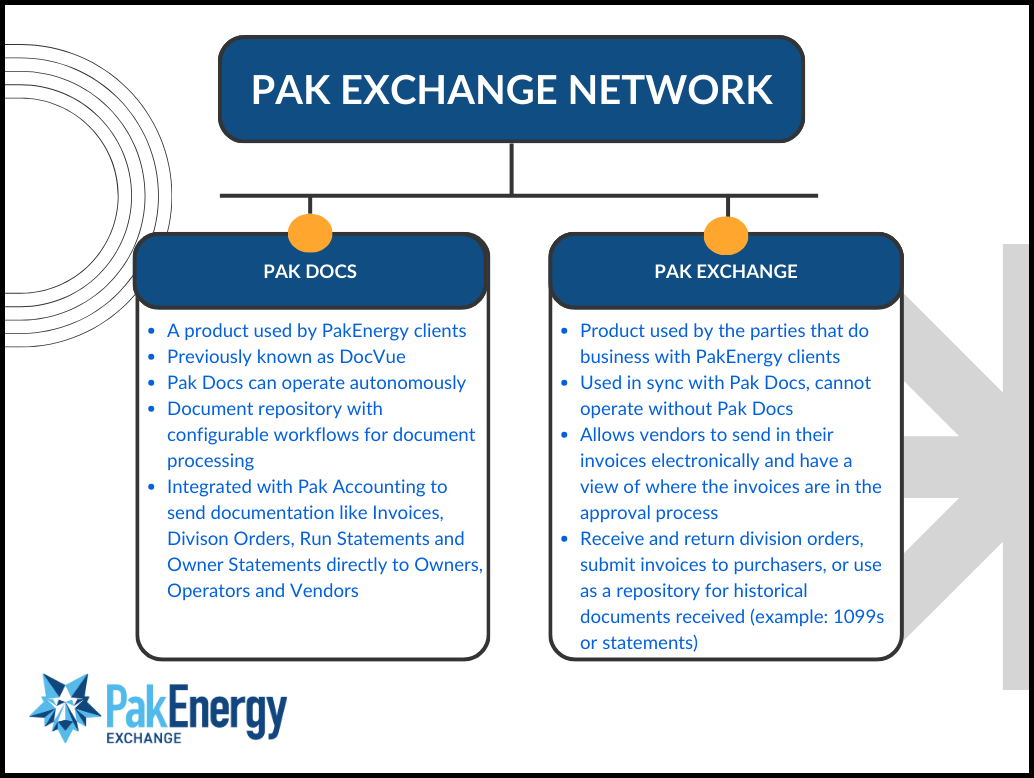
PakEnergy Exchange is a platform for exchanging various types of documents digitally through the Internet. It aims to speed up the process of transmitting those typically paper-based documents to ensure you have the most accurate information at your fingertips at all times. You are receiving an invitation because one of your customers has indicated that they do business with you and would like to start exchanging documents digitally with you and your company through the Pak Exchange Network.
Email Invitation Received
If you or your company are not already on the Pak Exchange Network please follow the below steps to accepting your first email invitation. Accepting this connection request will get you or your company ready to share documentation on the Pak Exchange Network.
Your invite will come grom pakdocs@email.pakenergy.com. The email will look similar to the one pictured below. It contains a link to set up your account, instructions to help you set it up, an FAQ section, and a link to Help Documentation, if needed, to help get you started.

Account Creation
After clicking the Set Up account button from the email, you will be redirected to the Pak Exchange Network registration page. NOTE: It is essential to use the specific Set Up Account link, or the URL included in the email received. Failure to use this link could result in a failed connection. Let's discuss the registration page. Fields in red are required.

Account Details | |
Legal Name | Please ensure that this field is the Legal Name as it relates to the IRS-issued Tax Identification Number (TIN).
This step is important because the Legal Name and Tax ID are just a couple of factors Pak Exchange uses to differentiate between connections. Please ensure this information is correct (as recorded with the IRS) and consistent with what is provided to the inviting connection. |
Known As | If your company or you, as an individual, go by a different name than what is associated with your EIN or SSN, you can list it in this section. This field is not required. |
Time Zone | Using the drop-down arrow, please select the time zone that you or your company operates in. |
Address Line One | The first line of your personal or company’s mailing address. |
Address Line Two | The second line of your personal or company’s mailing address. If a second line is not required in your mailing address, this field can be omitted. |
Address Line Three | The third line of your personal or company’s mailing address. If a third line is not required in your mailing address, this field can be omitted. |
Select a Country | Using the drop-down arrow, please select the Country in which you or your company does business. This will be the same Country as your mailing address. |
Select a State | Using the drop-down arrow, please select the State in which you or your company does business. This will be the same State as your mailing address. |
City | Please enter the City in which you or your company does business. This will be the same City as your mailing address. |
Zip Code | Please enter the Zip Code in which you or your company does business. This will be the same Zip Code as your mailing address. |
Tax Identification Type | Using the drop-down menu, please select the option for the TIN, EIN, or SSN that you will be entering for this account creation. |
Tax Identification Number | Use this field to enter the 9-digit number of the TIN, EIN, or SSN. |
Active Checkbox | Please ignore this checkbox. |
Administrative User | |
First Name | Please enter the first name of the Administrative User for your company. If you are joining the Pak Exchange Network as an individual, you will enter your first name. |
Last Name | Please enter the last name of the Administrative User for your company. If you are joining the Pak Exchange Network as an individual, you will enter your last name. |
Please enter the email address of the administrative user for your company. If you are joining the Pak Exchange Network as an individual, you will enter your email address. NOTE: The email address that is entered at the time of signup can be different from the one used when the invitation email was sent. The email address that is used at the time of signup is going to be the username from now on. | |
After all required fields have been entered, the Submit button will turn blue and become clickable. Click the Submit button, and you will receive a screen like the one below.

At this time, you should have received another email from PakEnergy - specifically, from notifications@email.pakenergy.com - titled "Welcome to Pak Energy." Please click on the blue link to set up your password for the Pak Exchange Network - the screen you will be directed to will look like the one below.

Password Requirements
When choosing a password for the Pak Exchange Network, you will need to fulfill the following requirements:
- At least 8 characters in length
- Must contain 3 out of the 4 following types of characters:
- Lower case letters (a-z)
- Upper case letters (A-Z)
- Numbers (0-9)
- Special Characters (!@#$%^&*)
- Lower case letters (a-z)

Once you have met the password requirements and re-entered your password for verification purposes, please click on the white arrow in the navy-blue blue box at the bottom of the screen.

This action will take you to the login screen for Pak Exchange. At this time, it is recommended that you favorite or bookmark Pak Exchange for faster and easier access in the future. The Pak Exchange URL is https://docvueexchange.com.
Accepting First Connection Request
Once you have logged in with the email address used at the time of account creation and your recently created password, you will be greeted with your home dashboard and a pop-up box that states, "Welcome to DocVue Exchange." If preferred, at this time, the User can click on the button Take Me there to add their company logo and to upload their first documents, like a W9 and an insurance certificate. To continue setting up Pak Exchange, we are going to select Skip for Now. For more information on how to add your company logo, please view our Quick Reference Guide: How to Add a Company Logo

With the Skip for Now button selected, we will navigate to the Invitations tab on the bottom left-hand side of our home dashboard.

Once clicked, you will have the option to Accept or Reject the invitation. However, please note that rejecting an invitation from anyone wishing to connect with you means that you will not be able to submit or receive any documentation from that requesting connection. If Reject is selected and you do need to exchange documentation with the requestor another invitation will have to be sent.

We will continue assuming that you want to accept the connection request. Clicking Accept will bring up a different screen that provides the option to Create a new connection or Select existing connection. For first time setup, you will not have any other connections to connect to. If you have questions about the Select existing connection option, please get in touch with our Customer Success Team. To continue, you will hit the Next button in blue.

The Create new connection option allows you to enter a name or number to identify the connection. If your company doesn't have a specific naming convention, you can also enter a description of the connection or use the connection's name as is. Once the name of the connection has been entered, you will notice that the Accept button on the right-hand side of the screen has changed from gray to blue. This means that all information required for this connection has been entered, and you are ready to continue.

Click Accept, and a pop-up box will appear confirming that you have entered all information correctly and have done any applicable due diligence specific to your company policies relevant to accepting documents from outside connections. If true, please click on the Continue button in blue to complete the connection. Once completed, you will be directed back to the Invitations screen, and a blue message will appear at the top of your screen letting you know that you have been successfully connected.

Was this article helpful?
That’s Great!
Thank you for your feedback
Sorry! We couldn't be helpful
Thank you for your feedback
Feedback sent
We appreciate your effort and will try to fix the article