OnPing has used Twilio to deliver calls behind the scenes for a while now, but we are broadening our connection with Twilio. You can enter your account details and link as many Twilio accounts as you like to your OnPing account. This allows you to send alert events to Twilio and create custom notifications while mixing in data from OnPing.
Required Twilio Account Information
OnPing will need your Twilio account information to create an integration for you. This information can be added to OnPing using the Twilio Integration Widget or the Twilio Integration Add Page. Your Twilio information can be found in your Twilio Account Dashboard. On your dashboard, you will need two pieces of information. The first is the Twilio Account SID, a unique identifier for your Twilio Account. The second is the secret Twilio Auth Token. As a 3rd-party integration, we require this authentication token to send messages using your Twilio Account.
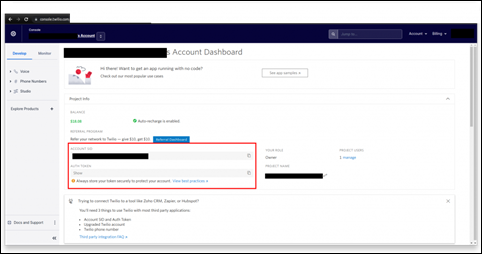
A screenshot of the Twilio Account Dashboard.
The Twilio Account SID and Twilio Auth Token fields are highlighted in the red box in the middle of the screen.
In addition to the Twilio Account Information above, you will also need a Twilio Phone Number capable of sending text messages. This phone number is purchased from Twilio and can be found by navigating to the “Phone Numbers” tab shown to the left of the Twilio Account Dashboard.
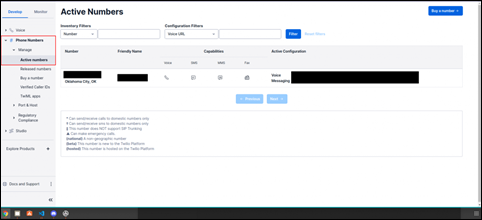
Active Twilio Account Phone Numbers can be found in the “Active Numbers” menu item in the Twilio Account Dashboard.
Creating a Twilio Flow
Twilio Flows are how you are able to customize what happens when a Twilio Integration Event Link is generated. Twilio Flows are created in the Twilio Studio. This can be found in Twilio by using the side menu and navigating to “Explore Products > Developer Tools > Studio”.
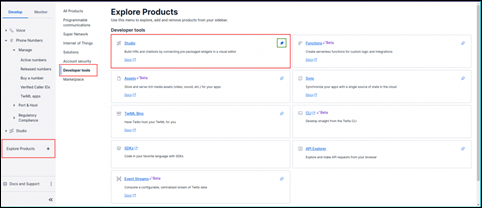
Red boxes highlight the menu items needed to open the Twilio Studio Page.
You can optionally pin the Twilio Studio to the sidebar by clicking the green-outlined pin icon.
Once on the Twilio Studio page, you will need to create a new Twilio Flow. The flow can be named whatever you want. It is best to also choose the “Start from scratch” option for the Twilio Flow template. Once you do this, it should open a drag-and-drop editor for creating and configuring a Twilio Flow.
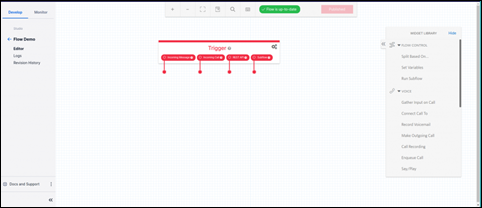
An empty Twilio Flow only containing the initial trigger for the flow.
Twilio Studio offers many widgets. For this demo, we will use the “Send Message” widget to send a message to the configured OnPing User when the associated OnPing Event Table is updated with a new row. To do this, locate the “Send Message” widget in the Widget Library panel and drag it into the flow editor grid. Once the widget is in the grid, drag a line from the REST API segment of the Trigger to the top of the “Send Message” widget. You can also customize the message content at this time.
(missing video)
Twilio Liquid Syntax
Twilio Flows can receive data from OnPing and that data can be embedded within your message bodies. Data can be from the first row of the event table and for each column in the event table, starting with the first column being column zero. The supported fields are:
- company
- site
- location
- result (The value of this cell’s PID)
- description (The description of this cell’s PID)
- display (Matches the configured display options of the event-table cell)
Source | Flow Rate | Tank Level |
0 | 0.3292 | 0.83435 |
Table 1: Example data. Assume for all parameters:
Company Name = BigCompany
Site Name = SmallSite
Location Name = RemoteLocation
Example cell data embedding for Table 1:
- {{flow.data.cells[0].result}}
0 - {{flow.data.cells[1].company}}
BigCompany - Location {{flow.data.cells[2].location} has a {{flow.data.cells[2].description}} of {{flow.data.cells[2].result}}!
Location RemoteLocation has a Tank Level of 0.83545!
Creating a Twilio Integration Account
- Go to https://onping.plowtech.net/v3/twilio/integration/add or any dashboard panel that has the Twilio Integration Widget added to it
- Click the “Create New” button in the widget
- Enter a name for this Twilio Integration Account
- Enter the Twilio Account SID
The location of this is described in the Required Twilio Account Information section - Enter the Twilio Account Auth Token
The location of this is described in the Required Twilio Account Information section - Select and OnPing Group for visibility within OnPing
Any users that are a member or owner of the selected group will be able to view and edit the integration - Click “Save”
Creating a Twilio Integration Event Link
- Go to https://onping.plowtech.net/v3/twilio/integration/link or any dashboard panel that has the Twilio Integration Link Creator Widget added to it
- Select your existed Twilio Integration created in the prior section
- Click the “Create New” button
- Enter a name for this Twilio Event Link
This should describe the purpose or action of the event link or the message. - Select a Twilio Flow
The displayed flows are populated from the selected Twilio Integration’s Account. If you do not have any flows
you will need to create one as described in the Creating a Twilio Flow section - Search for and select an Event Table
The Twilio Flow will be ran each time this event table has a new row added to it
This Event Table will be used to populate the Liquid Syntax inside the Twilio Flow’s message block - Select one or more OnPing users
These users will receive the messages as described in your Twilio Flow whenever the Event Table updates - Click “Save”
Was this article helpful?
That’s Great!
Thank you for your feedback
Sorry! We couldn't be helpful
Thank you for your feedback
Feedback sent
We appreciate your effort and will try to fix the article