The Alarm Table is used to organize sets of Alarm information in OnPing. It also enables certain shortcut features for Alarms, making this Table widget a commonly used tool for Users who frequently interact with OnPing Alarms. This document introduces the Table widget and explores a few of the organizational tools available in the features.
Prerequisites
Information from the following documents may either be referenced here or essential to understanding the information provided in this Alarm Table primer:
- Tables in OnPing
- Introduction to Alarm Creator
- The Alarms Page Guide
- Widgets
Alarm Table
The feature is optimized for basic Alarm information display, so minimal configuration is required. The basic elements of the Alarm Table widget are:
- Alarm Selector
- Fields
- Active Toggle
- Status Indicator
- Alarm Name
- Location Name
- Active Call Order
- Records
Basic Elements
Each Alarm Table will consist of a set of records (Alarms) and five pre-configured fields. The Table will also be associated with an ‘Alarm Selector’.
Alarm Selector
First things first – Users need a way to add alarms to the table! Some experienced Users may have Alarm IDs memorized, but we have integrated some features into the alarm selection process to make it easier. The Alarm Selector acts as a filter so Users may browse through all available alarms.
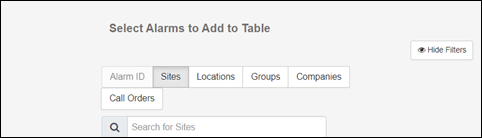
Several filter options are available
Select Sites, Locations, Groups, or Companies as a filter category. After selecting a category, a list of available subgroups will appear below. For example, if a User selects the ‘Groups’ category, a list of Groups visible at the User’s permission level will appear. The search bar can be used to further filter that list.
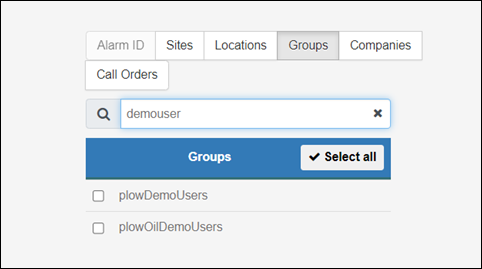
Here, we are filtering by ‘Group’ and using the search bar to limit our results to ‘demousers’. This is not case-sensitive.
Selecting one or more options will display the Alarms associated with that categorical reference.
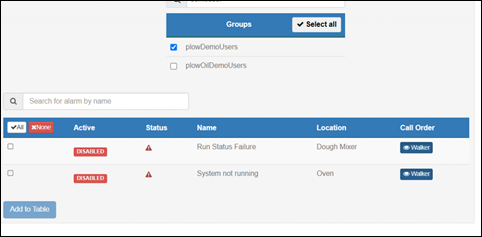
Alarm Selector is easy to use. Multiple Alarms can be added to the table with a single search, but Users can also always come back and add more later as needed. Select the desired Alarms and click ‘Add to Table’ to view information!
**Selected Alarms will be removed from the Alarm Selector on this table feature, but can be added to other instances of Alarm Tables**
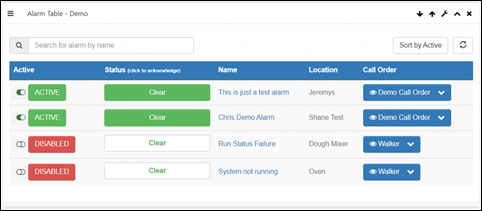
Two new Alarms are visible in our Table!
You may notice that there are four Alarms visible in the example image. Alarm Selector works the same way for newly created or existing tables!
The Table
Fields
Alarm Tables are pre-configured with 5 fields, labeled:
- Active
- Status
- Name
- Location
- Call Order
Active
This column is a toggle for an Alarm’s activity. If an Alarm is active, it iterates through Call Orders and reads a parameter value. A ‘Disabled’ Alarm retains settings but does not read a parameter value or make calls.
Click on the button to toggle the active status to ‘Active’ or ‘Disabled’.
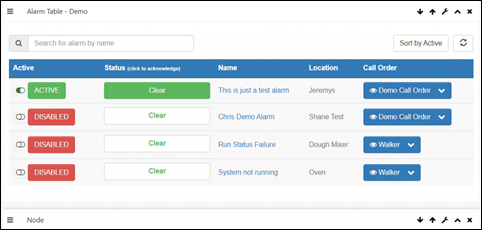
‘Chris Demo Alarm’ is now ‘Disabled’
Status
The Status field includes a button that indicates whether an Active Alarm is tripped or clear. Acknowledging an Alarm does *not* clear it; it only creates a temporary marker that it has been noticed.
Name
The Name field displays the current name of an alarm. To change an alarm's name, you will need to open the editor on the Alarm Creator page.
Location
The Location fields indicate which device the Alarm is reading information from. Location is another setting that can be managed on the Alarm Creator page.
Call Order
The Call Order field displays the current Call Order associated with an Alarm. Clicking the button in this field displays contact information for members of the current Call Order.

Records
The Records, or rows, in the Alarm Table each represent an Alarm that has been added to the table. As previously mentioned, Alarms are removed from the Alarm Selector after being added to a table, so no duplicate records should exist.
**If multiple instances of an Alarm seem to appear, that may mean a redundant Alarm was made and should be addressed**
In our example table, there are currently four Alarm records listed. Additional records may only be generated by using the ‘Alarm Selector’.
What If I Need More Alarm Info?
Alarm Tables are designed to quickly organize sets of Alarms and key Alarm information, and to provide basic interactive features for Users. For more information about Alarms, we recommend checking out these features:
- Alarm Logs
- Logs store lots of useful Alarm information like Clear and Callout history, Alarm acknowledgments, and more.
- Alarm Nodes
- The Alarm Node widget provides extremely granular information about the composition of an Alarm. This can be utilized by integrators or advanced Users to troubleshoot an Alarm system.
Contact Us
For help with Alarms, reach out to an OnPing representative or email us at info@onping.net.
Was this article helpful?
That’s Great!
Thank you for your feedback
Sorry! We couldn't be helpful
Thank you for your feedback
Feedback sent
We appreciate your effort and will try to fix the article