Guide to transferring OnPing data tables to Excel sheets:
Table of Content
- Setting up the template file
- Writing DHALL file
- Transferring the data table
Setting Up The Template File
Requirements
You will need:
- An Excel (.xls) file – This will serve as the Template
- A Table in OnPing to pull data from
What is the Template?
We need a template so Excel can interpret the OnPing data. This will work with the map we create inside the Dhall file to format our Excel table.
1. Setting up the template file
- First, open/create our Excel file that we wish to put all of our data in.
- Format the file so that each row and column is organized to account for future changes or additions to
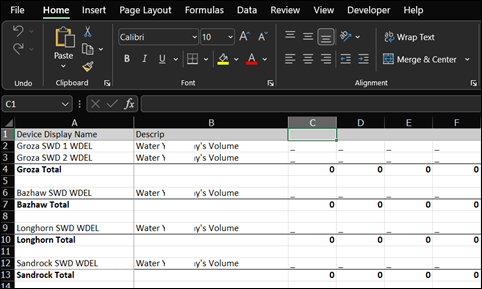
- Initially, fill each data value inside the spreadsheet with a blank space “_“. This will represent data that should be there and help identify if something is missing
The image below can be used as a visual reference for what the spreadsheet should look like. You can use multiple sheets within an Excel file.
Writing DHALL file
Creating the base .DHALL File
- Open up your preferred development environment
- Create a new file (.DHALL)
- Insert code below (from Example 1) into the new Dhall file
Example Code 1
let CellTransform =
{ from : { _1 : { _unCRow : Natural }, _2 : { _unCCol : Natural } }
, to : { _1 : { _unXRow : Natural }, _2 : { _unXCol : Natural } }
}
in let pairTransform =
\(r : Natural) ->
\(c : Natural) ->
\(er : Natural) ->
\(ec : Natural) ->
{ from = { _1._unCRow = r, _2._unCCol = c }
, to = { _1._unXRow = er, _2._unXCol = ec }
}
: CellTransform
in [ { pairTransforms = [ pairTransform 0 0 1 1 ]
, sheetName.unSheetName = “SHEET1”
}
]
This code just formats our data to make it readable between OnPing and the .xls file upon resolution. For now, let’s move on to where most time will probably be spent.
Formatting the ‘Sheets’
Below is an example of one of the rows we’ll include in our template. The first line is a comment that emphasizes the importance of keeping track of which sheet you are working on. Each sheet must be formatted individually. We recommend adding a similar comment line for each sheet as you work. These sections will get extremely long very quickly – so this is important.
Now, let’s take a closer look at the 3rd line. This line is where we create the basic map for our .DHALL file.
How To Create Sets for our .Dhall map
Our map will reference pairings between data records in OnPing and the .xls Template file. In Example 2, there are 4 lines, each labeled with a reference to an OnPing Row/Column or a Template Row/Column. We will refer to these as a set. For each set:
- Name the set
- Be consistent with your labels. These maps can become long. Good labels make it easier to find specific points while troubleshooting later on.
- Match the data from the desired columns/rows in OnPing to the respective columns/rows in the Template .xls file
- Notice, in Example 2, each set has 4 numbers or references to data. These will be used to retrieve and format our .xls file.
**Each set accounts for one row/column pairing. Iterate through this process for each pairing on the sheet. Once complete, you will have a map for 1 Sheet. Each Sheet in the file will need its own map**
We can combine the sets on a single page to create a ‘map’ of the Sheet. Combine the maps of each Sheet to create a ‘Master Map’ of the full .xls Template file.
How the Sets Work
As you can see in Example 2, there are four entries for each set. Each entry will be associated with a column/row value from either OnPing or the Template:
- First Entry: OnPing Column
- Second Entry: OnPingRow
- Third Entry: Template Column
- Fourth Entry: Template Row
To find the location of your data row/column, open OnPing and navigate to the table you want data from. Then:
- Click on the Wrench to open ‘Editing Mode’ for the table
- Click “Edit Table Config”
- ctrl+F, and search for the label of your desired column/row.
- Your data should come with a column/row number that makes it easier to find in massive amounts of data.
Recall that the last 2 numbers in each set correspond to the row and column values in our Template file. Unlike the OnPing data table, Excel starts with 1 rather than 0. Keep that in mind as we create the map between the OnPing and Excel tables.
Example 2
--[Insert column/row name here]
in
let [Insert a proper sheet name here] = [
tft [Onping column #] [Onping row #] [Template column #] [Template row #] ,
tft .... ,
.... ,
tft .... ,
tft ....
] : List CellTransform
After completing the DHALL map convert the data into sheet form using concat. To do so, simply copy and paste the code from Example 3 into your program.
Remember, you need a DHALL map for each sheet in the Template! The resulting ‘master map’ will include the maps for each sheet
Change the sheet “unSheetName” to the appropriate name based on the sheet’s name in the template that you are putting this sheet into.
Example 3
in
let [Name of your sheet within the code] = {sheetName = {unSheetName = "[Name of the sheet in the template file]"},
pairTransforms = concat CellTransform [ [Name of your Cell Transformations] ,
... ,
...
]}
Then you will want to output them all as one final list
Example 4
in [ [Name of your sheets within the code],
...,
...]
After Creating the Map
You spent a lot of time making maps. Now, save your work!
- Save the files you’ve been working on
- Template file (.xls)
- Dhall file (.Dhall)
- Open command line editor
- Go to the location of your DHALL file
- Create a resolved version of the DHALL file
- Use the code in example 5 to create this
- You will use the resolved file for the transfer process
You must run the command in Example 5 in an Ubuntu or GitBash-enabled environment
Example 5
dhall resolve <<< ./[Name of Dhall file].dhall > resolved-[Name of Dhall file].dhall

With that, you have both your template and the resolved Dhall file ready for your transfer
Transferring data table
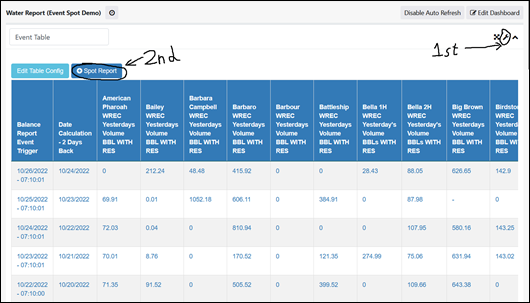
Hop onto OnPing and find the event table that you wish to transfer to Excel.
- Click on the wrench icon to open widget editing mode.
- Click “Spot Report”
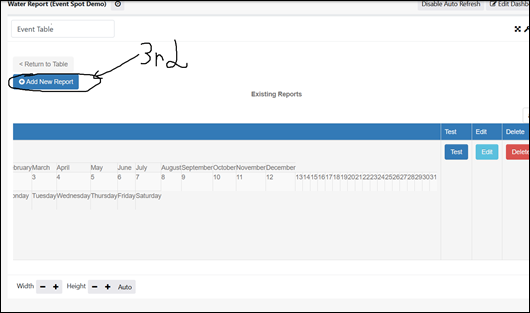
- Click “Add New Report”
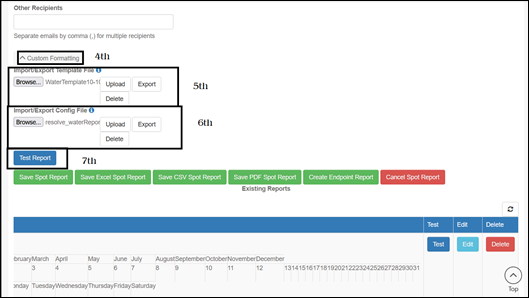
- Scroll to the bottom and click “Custom Formatting”
- For the Template File, you’ll want to browse and find your template file, aka the Excel file, and put it in. You’ll want to hit “Upload” as well.
- For the Dhall File, browse your computer for the resolve dhall file we made earlier and select it. Again, you’ll want to hit “Upload” as well.
- Finally, hit the “Test Report” button and wait a bit.
If all is working, then you should get no errors. Eventually, a new Excel file will be returned. This file will be filled in according to the map you created earlier.
- Review the sheet to ensure there are no blank spaces and that everything is filled in correctly.
Was this article helpful?
That’s Great!
Thank you for your feedback
Sorry! We couldn't be helpful
Thank you for your feedback
Feedback sent
We appreciate your effort and will try to fix the article